 Using images
To add images you can do one of two things:
- Upload it to the github repository manually, outside of the Lovable UI
- Share an external image URL in the chat. a. Note: This will not work if the server hosting the URL has chosen to block external websites from using it with "CORS"
Below, we’ll walk you through the two methods.
Image placeholders
By default, if Lovable recognizes the need to use images in your projects, it will use placeholder images - gray, neutral images to improve user experience and orientation.
Using the techniques described below, you can replace those placeholder images with more relevant, and centextually meaningful images.
Using an external image URL
One way to add images to your project is by referencing an image from an external URL. This method allows you to use images hosted on external platforms like Unsplash, Imgur, or any other image-hosting service. Be mindful of use copyrights!
Here’s how to prompt Lovable to use an external image:
- First, find the image you want to use. For example, you can visit a site like Unsplash, select an image, and copy its URL.
- In your project prompt, simply tell Lovable to use that image by specifying the URL. For example:
Using externally hosted images
Example prompt:
Use the image from this URL
https://upload.wikimedia.org/wikipedia/commons/thumb/7/73/Pale_Blue_Dot.png/442px-Pale_Blue_Dot.png
for the hero section image.
Using images from your GitHub public directory
Another method to add images to your Lovable project is by using images uploaded to the public directory of your connected GitHub repository. Here’s how you can do it:
Connect your GitHub repository - Ensure your project is connected to your GitHub repo. Here's how to connect your repo.
Locate the public folder - Inside your GitHub repository, navigate to the public directory. This folder is typically used for hosting assets like images that can be referenced in your project.
Click on Add file and then from a dropdown, select Upload files option.
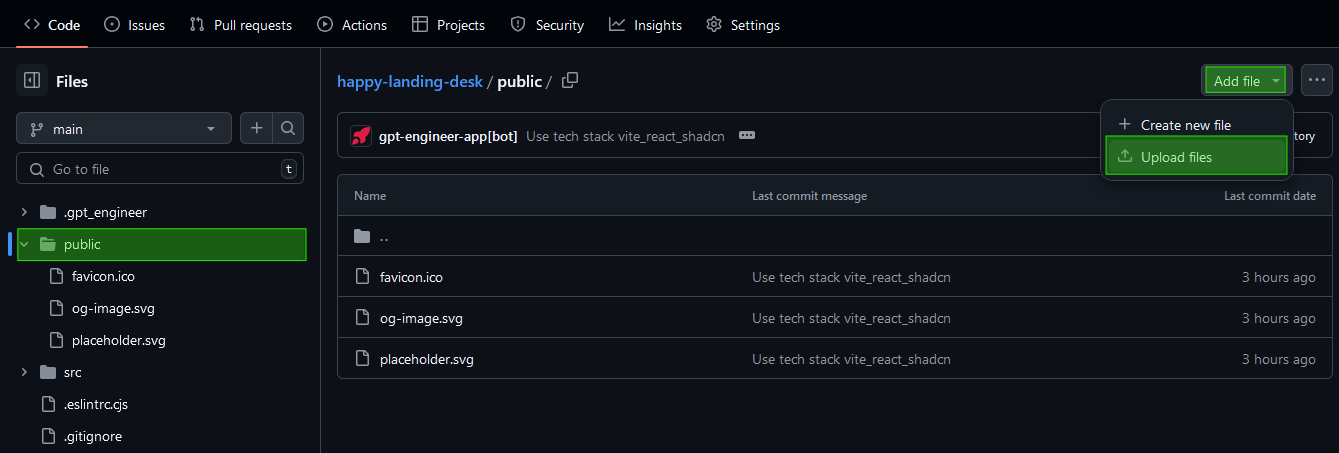
Upload an image - The next step is to transfer your image to your repo
-
Drag and drop the image into the public folder, or
-
Click on the "choose your files" link to browse and select the image file.
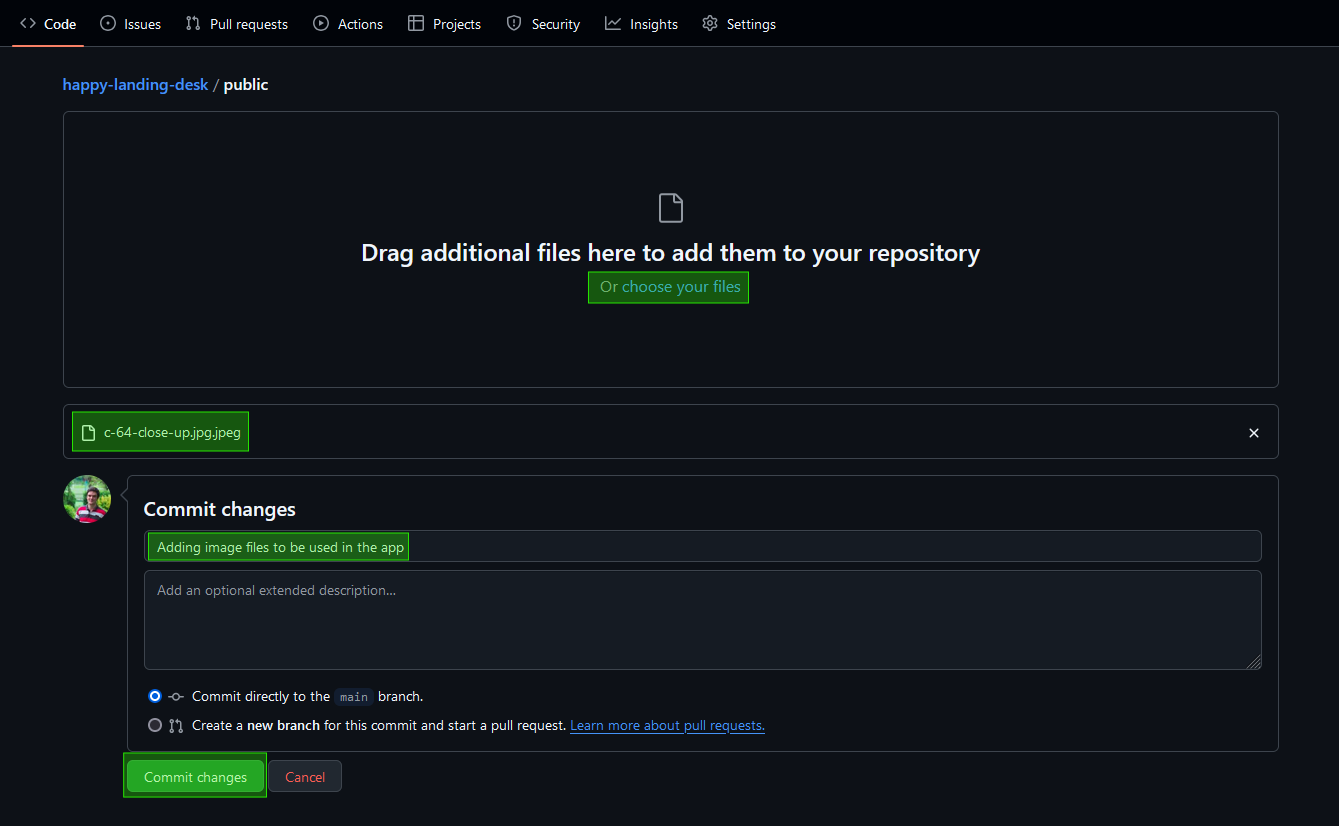
Commit the changes - After selecting your image, write a simple commit message (e.g., "Adding image files to be used in the app") and click "Commit changes" to save the file to your repo.
Get the image path - Once the file is uploaded, select it and then click on the copy icon next to the file name to copy the image’s path. This path will be used in your Lovable prompt.
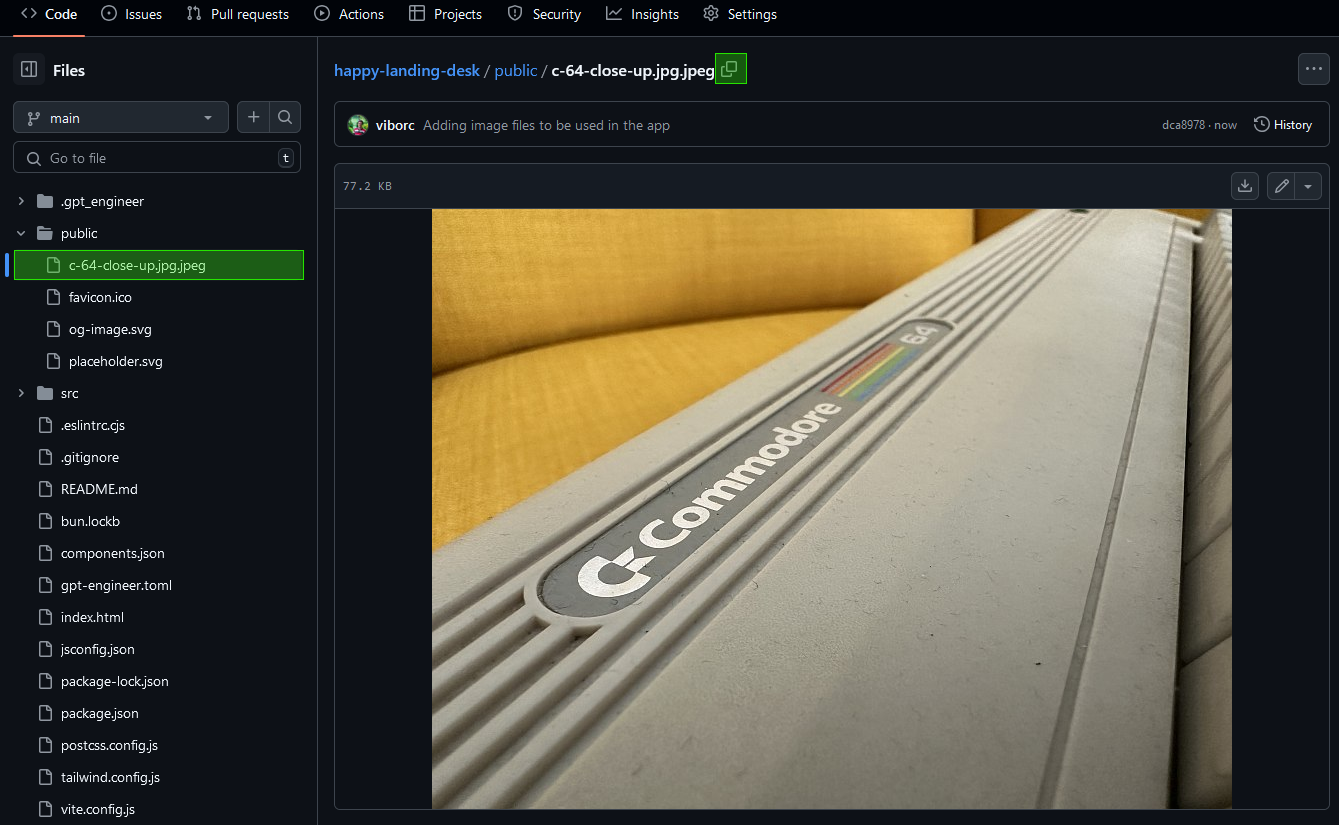
Use the image in Lovable - You can now reference this image in your project by using a prompt like the following:
Using image from public folder
Example prompt:
Add an additional image to the hero section.
This time, use this one from my local repo: public/c-64-close-up.jpg.jpeg
Be mindful of image file sizes
Uploading large images to your GitHub repo can cause it to grow in size, which can affect Lovable performance (longer repo cloning times, slower startup of previews/sandbox).
Try to optimize your images before uploading them to your public folder by compressing them and using dimensions that are relevant to your use case. For example, don't use a full HD-sized image if it will only be displayed as a small icon.
Using Base64 encoding
The third method to add images is by using Base64 encoding. While this is an option, we don't recommend it, as it converts the image into a long textual string that can consume a significant portion of your project's context. However, if you wish to use Base64 encoding, follow these steps:
- Upload your image to a Lovable-built project by one of our community members. Thanks, ntindle!
- Once the image is uploaded, the app will generate a Base64-encoded string for your image.
- Copy the Base64 string and use it in Lovable by using a prompt like this:
Using Base64 encoded images
Example prompt:
Now add the third image to the hero section.
Use this Base64 encoding:
iVBORw0KGgoAAAANSUhEUgAAACgAAAAoCAYAAACM/rhtAAAACXBIWXMAABYlAAAWJQFJUiTwAAAAAXNSR0IArs4c6QAAAARnQU1BAACxjwv8YQUAAAofSURBVHgB7VhdjFVXFd5r7X3OHf6nxgds2jChpVWMFKImmFiZJm1iYi2TJj7YhwJJU61CwaSWkqhooiKxhtgaf5oQwBdUEpsmWrSJOLUhPlmorTYWq0BLMTaEofN3zzl7r+W39rnEAjPMUB760nOzc+7Z52d/+1vf+vY6x7n3tqvbyF3l9oE3frREurSCmRe6xGp9IRXKyZ3Q0Hfu5LJ7/uauYntHAK977bE1Tt29SfkuFbeI1Ck5QHKsmigycaLkE2loiIszTsJhYv/MiZvu/rW7wu2KAH7wn7vWx0DfaJQGhEkFfKmBElWAEWdAiRIA4T9HVoB0ITotALZoyJUnoi9/+PpNd8wa6KwArn5510AVdE/DtAajuEiUmzrKAAEUINEUkNDQJyQhsfNJxSfmMmoKiagDwJ0IkC8qlQ+cWrb69ZnG5pku+PSRHQN9Lh6aI7qmI0IlyCqALBg0g6hiUEGcYxxDhMpspwhYVQM4xqVSMugD0SWoLlVkpRP3i8XHnl9+VQDXA9w81kNzkwz0SXIAaKO4AnQVSQkInKf8EMpgLSL4qZMMFuA9joMIYq4S0Fc40RKIS/C+FEMcWHzspeXvCOCWI9v7yyYemgdw81JyAElzALCvBzIAXCEABlYNKFgjAruUcQIk4g32gAmMOswDbAJ4IAOJIOCSgkXfj3nted+ZYwunwxGmOzHvLbfdF3HAYw7etWKlPB9tf5xhOMvfxgnG9UCJnQAkrrSMwaHTJIyw2uUAT1kOdhODZaS8qJel5Rl5zAI2FY4pk+QnB7cOvNXx/5rw7CYL7yaCd+OeaNxjj0BNgJMu+roYrrGGMZEBAOWBD6QZXvwnRFiBABmOqZWC6OIsJGgxYIiGeqJh9Pnis/+98cbDs2KwdLR9QZR8MvR4w4SduTCUBb7AjxgH6EZ4hTKdmV3oDmC9MWd5Y/lNmWrs2eKPhzD1Ut+4tXQiwiR0Kx5w14wAn3xyy0AT4zqsBVlXCK+ZnBOfFeUSfhG3wezQDGwvCGomaONY8kKcxmQOM+6GhiEBC604kwO3F5DY1fYEocYXn7rm1VcXnb3hhnOXBdgnbrBILXt5tthJHr4F02DQSAbTZYCJPaBKVpVdk+yfZo80AyfX2qUlkPVCd2rLIC4Rs02xCNh1mAgHoS/hsTsuC3B+1LUxq8nlCBk/YiDFbZl0fK7DaW2TaCiyACw7OHEOcU4cm0qeWJskapqQzL+dNsjOCLeFB/lvaI1fc3gEGYxSuHVGgHNUb2mSKcoWMkw8GXNWANDIQ7d/ax8u2bv+zzsGPMtgR3VdUh20GkHywJQn1LTp3QJU18rQQglQsFPyOdktt81AqfXPzDCtcJfT4JE9W/qDNAOc04KzI5ieLJQWl/Pb3k9sO247a7bSeJHBgmkz1pKVTQ9VMhYtgYzRzKLFN6d3Bo+Q5LyntsesCfhd/zUvv/aRsx+6/sXzY11g1PNDXFmAODPiMtpqYSYgWD2xiqgbgv0MXjzD363adnx41ba9h295aBVH/aZHbL3YamxGA0MHJm+1jglZsqHnRtafpdhbfixtEu6pZMm0DLoYXREsVTEpcwrQkHLI1NVRhkrioV0Htx0fLcLwOS/7fnDbd4bffnsp7YybNq4t805z6L3ZvbpWm+3abalsKsIZjGMhhuWgrlw0LUAcDJj0zBBAnLOCwFYRrE34D0YRdfQd916PptHxo+5ivdRGB/SevaUFaxOkrBTJT8lsUcujapuEKZnnUPYzMD89QAOTw9AWALaAIkTWr+b/e9OofGXThu+PuCm2oT9u768krcQSa7JFEEyLPfO2JGqR5t6sOHMIzSVQOxFTvNp9F5YHF4YYmWqrvTk+m8v01lAzkY7w8IYNuy4B98WD2we7RVg36cLa1FC/2CgtrnZE7S3KpkEAC5bJrs1s6vXb9cZgAiMiPL1Ro8w8Llm1relbWuW6yVLS/T+LHz+wdXAs8NpRH9aNC/XHBkxDtx1uvdDEZNNq85Nbp0dIYx6EWuymV5/JtrpMk9W5ViWxjEwLsEky4rObZvpcrp1M4JydbOVT+7YMjIWweTRpP+ollFvQJRbkEqMlb1Wg5mloWwy6Npy5OtRkVZGxZ5KxWuZ8RZYXaMqOne261pNvx3RJNXPyx/efwUz7I6hDpUIV2OzigZPYW3UzhqVtDOesshnzwU2gGpxA3yT7kS6HkS76KtTbDUq+Bnv4ApbG0hpY6iyCcS0y02pQwSQou+GO2DnlQhot5NTgkv5pGbQNcRgGXUNmNa5XflAbqRwq31afFFB+FhFVKFhDeQwA8uzPPv/I3e4y2+rfPL0JD3vUFl4vVupa1qIow3G0f45fuPieSyvqRp7F1MRegiRiLWgMNJCZgKA1QmMYna/xslEDJBr22qn0qJth4yRLAqp/vJgKiIAeUCtiZvClpA2ssNLnLr7nEgaF4881hkc1e5WJQ1rBSy+7cRzMXKVnQziVvZ38igd37/w6wuysRS5djfB3PV65eA7+F5pqurMOZJVl1h1knsTjgXWuNiWFYv/FeKasqF/53n3PoEJeU+MpePN2tq9MhyC8C711nVXVWXemwQyo6wvtcoFKu9Aabyw4BqgSfQDKHauitfJ9IKpQaE4wAew7qYb2BNqrOfz1xNDSO2Zk0LYY9duY463E2W9cb0Unykt6Oy3m1o2yJtGBnDE9EuwGg0Nj8A1GZ4CXWPmXvLm1la0s2Veg6OjN+rKHJ7D5xFRYpnyrW/613X+S6J5KteCFG9pACKCbZN8MXA1t15Sbb9AqfOTAOcZ/bmzP0h5DXzUib32ocHEt9hyR2ngOWckZvT2xwZMiv/Dvzy09MBWWad/qqi5/gQt6DtX6QC5Y8wcYc7bQ0mjLljdSfa6p2HOuBq3YY+gKDafBILIzkZk0ow8NNDdN/o4jGqxGoLMoY+6fDse078Uf2/nEObz33IPsfRNG1eQGDlyEdaGhP4K1CJbAC3gyHtAL0Tau7p3DWa3xuiFF7cEh2K21ogpncQXurLiLp371lfU3n7pigLZ9/Ls/fSk2tBHhfhOD1oDVKIZGujWAaaBriAu93oBh0KLmGLC3gMKIEuPY102lNWhELeEs6F1ME8D8BFaTR/5+34f/cDkMs/p49PsHNlyvffN/WVO4ziyxwipRhYIrDlo5W2VKYCx03CMzkbUThCymIlUlstaVCZmMDC4tgxNWEKm4ONkob39+80f/MtPYs/789vSmTQsbFx6ELdyLpQx0UV7Sal8iZrAZKqRbADiAmL2MI59T6APQMlW+I7AiaaiMyZf7T8e4+x9bPzk6m3Gv+APm/o0PXxt9uD02fOckhZubAJ/D28Zk0UcGcgJeGIuOdjXEydCH9C+xL07jut+OL6RfDX/5trErGe+qPgE/vnHntVFpMb4ZLut25i6YjLy46nSo9n1vVIFGGzf39PiC4tiBhz/zH/fe9i5t/wPh3w4BN34V0AAAAABJRU5ErkJggg==
Keep in mind that this is a real Base64 encoding, so you can use it as an example prompt.
Explore more and learn from examples
To help you better understand how to integrate images using the methods outlined above, we have a project you can explore: Lovable Project Example. In this project, you can see the actual prompts and how each method works in practice.
Additionally, here's a public GitHub repository that includes the commits, uploaded images, and full implementation details. You can view the repository here: GitHub: Adding Images Example.
Feel free to explore the project and repository to deepen your understanding and improve your implementation skills.